| ||||||
| App. A: Instructions for Six Expedient Fallout Shelters |
SHELTER-BUILDING INSTRUCTIONS
The following step-by-step instructions for building 6 types of earthcovered expedient shelters have enabled untrained families to build even the most difficult of these shelters in less than 2 days. The only families who took longer --up to 4 days-- were the few who were delayed by very heavy rains. Each of these shelters has been built by several different families or groups of families. Only widely available materials and hand tools are required. They have been built under simulated crisis conditions in environments typical of large regions of the United States: covered-trench types have been built in forested clay hills of Tennessee, in a bare Colorado valley in snowy November, in an irrigated Utah valley in hot August. Most of the aboveground shelters were built by families in Florida, where the water table is within 18 inches of the surface.
All of these test families used instructions that contained general guidance to help inexperienced persons build almost any type of earth-covered shelter. In this appendix, general instructions which apply to all types of shelters will be given first, to avoid repetition. (However, if the instructions for building one type of shelter are reproduced separately, the pertinent parts of these general instructions should be given before the step-by-step instructions for building that shelter.
WARNING
Earth-covered shelters built of green poles can become unsafe within a few months, because of fungi and/or boring insects. In damper parts of the U.S., earth-covered shelters built of dry poles or untreated lumber can become unsafe after several months. An exception is very dry areas of the West, where some pioneers lived for years in earth-covered dugouts with pole roofs.
GENERAL INSTRUCTIONS FOR BUILDING AN EXPEDIENT SHELTER
1. Read all the instructions and study the drawings before beginning work. (Most families have found it helpful first to read the instructions aloud and then to discuss problems and work assignments.)
2. Sharpen all tools, including picks and shovels. Dull tools waste time and energy, if no file is available, tools can be sharpened by rubbing them hard on concrete or a rough stone.
3. Wear gloves from the start. Blisters can lead to serious infections, especially if antibiotics cannot be obtained.
4. Whenever practical select a building site that:
° Will not be flooded if heavy rains occur or if a large dam farther up a major valley is destroyed by a nuclear explosion.
° Is in the open and at least 50 ft away from a building or woods that might be set afire by the thermal pulse from an explosion tens of miles away. (Keep well away from even a lone tree; it is hard to dig through roots.)
° Has earth that is firm and stable, if the planned shelter is to be a trench type with unshored (unsupported) earth walls To make sure that the earth is firm and stable enough so that the walls will not cave in, make a "thumb test" by digging an 1 8-in.-deep hole and trying to push your bare thumb into the undisturbed earth at the bottom. If you can push your thumb no farther than 1 in.. the earth should be safe enough. If the earth does not pass the thumb-test, move to another location and repeat the test. Or build a below ground shelter with shored walls, or an aboveground shelter.
° Has a sufficient depth of earth above rock or the water table for a trench to be dug to the depth required.
Book Page: 156
(To find out, try to dig a pit to the required depth before excavating the whole trench. Or, if you are quite sure there is no water- table problem, try driving down a sharpened rod or pipe to the required depth in several places along the planned length of the trench.)
5. If the shelter must be built on sloping ground, locate it with its length crosswise to the direction of the slope.
6. Before staking out the shelter, clear the ground of brush, weeds and tall grass over an area extending about 10 ft beyond the planned edges of the excavation. (If loose earth is shoveled onto tall plants, the earth will be difficult to shovel the second time when covering the completed shelter roof.)
7. Stake out the complete shelter, and then dig by removing layers of earth.
8. When digging earth that is too firm to shovel without first breaking it up, start picking (or breaking with a shovel) in a line across the center of the trench. Next, shovel out a narrow trench 6 or 8 in. deep all the way across the width of the trench. Then with pick or shovel break off row after row of earth all the way across the width of the trench, as illustrated.
(Illustration of pick axe chipping away a layer of dirt) ORNL-DWG 78-16212 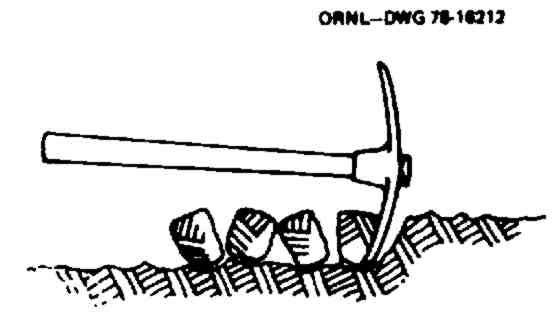
9. When digging a trench, to avoid having to move the excavated earth twice more to get it out of the way, first pile all earth about 8 ft away from the trench. Later, pile additional earth you are excavating at least 3 ft away.
10. Never risk a cave-in by digging into lower parts of an earth wall. It is dangerous to produce even a small overhanging section of wall or to dig a small, cave-like enlargement of a shelter.
11. When making a "sandbag" of a pillowcase or sack to hold earth shielding in place around the sides of shelter openings or along the edges of a shelter roof, fill it so that it will be only about two-thirds full after its opening is tied shut securely. Avoid dropping the sandbag.
12. If sufficient sandbags are not available, make earth-filled "rolls." Bed sheets or any reasonably strong fabric or plastic film can be used to make these rolls as described below. (To make a longer roll than the one illustrated below, several persons should make one together, standing side- by-side.)
To make an 8-in.-high earth-filled roll:
(1) Select a piece of cloth at least as strong as a new bed sheet, 2 ft longer than the side of the opening to be protected, and 5 ft wide.
(2) Place 2 ft of the width of the cloth on the ground, as illustrated.
(Illustration of man placing earthfilled roll.) ORNL-DWG 78-16213 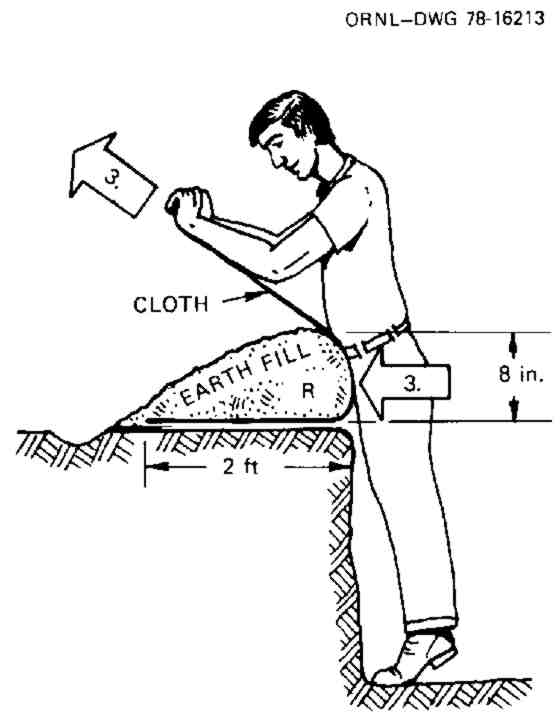
(3) While using both hands to hold up and pull on 3 ft of the width of the cloth and pressing against the cloth with your body, have another person shovel earth onto and against the cloth.
(4) While still pulling on the cloth, pull the upper part down over the earth that covers the lower part of the cloth.
157
(5) Cover the upper part of the cloth with earth so as to form an earth-filled 'hook" near the upper edge, as illustrated.
(Illustration of finished earth-filled roll.) ORNL-DWG 78-16214 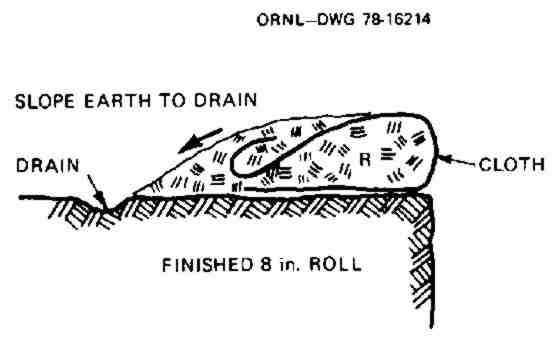
(6) If a greater thickness of rolls is needed, level the earth on top of a roll; then make another earth-filled roll on this level surface.
13. Cut and haul poles and logs more easily by doing the following:
(1) Take time to sharpen your tools before starting to work no matter how rushed you feel.
(2) When sawing green trees that have gummy resin or sap, oil your saw with kerosene or diesel fuel. If you don't have these, use motor oil, grease, or even soap.
(3) When felling a small tree, the following method will help make a square cut, keep your saw from being pinched, and help make the tree fall in the desired direction: (a) Saw the tree about one-third through on the side toward which you want it to fall. (b) Then start sawing the opposite side, while another person pushes on the tree with a 10-ft push- pole, pressing the end of the push-pole against the tree about 10 ft above the ground. A push-pole with a forked end or with a big nail on the end is best when you get ready to move it, or to use it for building your shelter. Make and use a measuring stick to speed up measuring and cutting poles and logs to the right lengths.
(4) After a tree has been felled, trim off all limbs and knots so that the pole or log is smooth and will require no additional smoothing
LIMB CUT OFF TO HOOK OVER THE SQUARE-CUT END OF THE ROLE. (ORNL-DWG 78-16210) 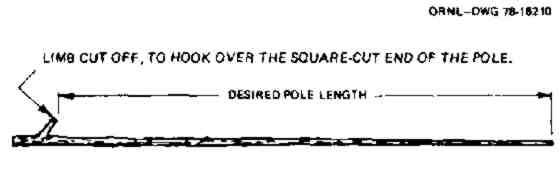
(5) It usually is best first to cut the poles exactly two or three times the final length of the poles to be used in the shelter.
(6) When you are ready to move the poles to the shelter site, drag them rather than trying to carry them on your shoulders. Shouldering them is more tiring, and you could injure yourself severely if you should trip.
To drag a log or several poles by hand: (a) Cut a stick 2 to 2-1/2 in. in diameter and about 3-1/3 ft long; (b) Tie a short piece of 1/4-in. (or stronger) rope to the center of the stick; (c) Make a lasso-like loop at the free end of the rope, so that when it is looped around the log and two people are pulling (see illustration), the front end of the log is raised about 6 in. above the ground. The loop should be tightened around the log about 2 ft. from its end, so that the end of the log cannot hit the backs of the legs of the two people pulling it.
(Illustration of 2 men pulling a log.) ORNL-DWG 78-16211 
CAUTION: If you drag a log down a steep hill, one person should tie a rope to the rear end of the log, and then follow the dragger, ready to act as the brake if needed.
(7) When you get the poles or logs to the location where you will build the shelter, cut them to the desired minimum diameters and specified lengths, and put all those of one specified type together.
Book Page: 158
Be sure that the diameter of the small end of each pole of one type is at least as large as the minimum diameter specified for its type. Make and use a measuring stick, as previously described.
14. Use snow for shielding material for aboveground shelters if the earth is so deep-frozen that digging is impractical. For a Ridge-Pole Shelter (see Appendix A.5), cover the entire shelter with 5 ft of wetted or well-packed snow. For a Crib- Walled Shelter (see Appendix A.6), fill the cribs and then cover and surround the entire shelter with snow at least 5 ft thick. With wetted or well- packed snow 5 ft thick, the protection factor is about 50. Families have completed these winter shelters within 2 days.
Several hundred pounds of snow can be moved at a time by sledding it on a piece of canvas or other strong material 6 to 8 ft wide. Attach a stick across one end of the material and tie a rope to the ends of the stick, so as to form a 'Y" bridle on which a person can pull.
To keep the occupants of a snow-covered expedient shelter dry and tolerably warm in subfreezing weather, provide sufficient ventilation openings to maintain inside temperatures at a few degrees below freezing. (See Chapter 14, Expedient Clothing.)
15. Make a reliable canopy over the shelter entry. By following the instructions given in Fig. A on the following page, you can make a dependable canopy that ordinary winds will neither tear nor blow down and that will not catch rainwater even if you have no waterproof material stronger than 4-mil polyethylene film.
16. Take to your shelter enough window screen or mosquito netting to cover its openings. Except in freezing-cold weather, flies and mosquitoes would soon become a problem in most localities soon after an attack.
17. Work to complete (1) an expedient ventilating- cooling pump (a KAP) and (2) the storage of at least 15 gallons of water per person. This work should be accomplished by the time your shelter is completed. Especially in an area of heavy fallout during warm or hot weather, an earth- covered, high-protection-factor shelter when full of people would be useless unless adequately ventilated and cooled and provided with enough water.
18. In cold weather, restrict air flow through the shelter by hanging curtains of plastic or tightly woven fabric, or by otherwise partially obstructing its two openings. Always be sure to leave at least a few square inches open at the floor level of one opening and at the ceiling height of the other, to provide enough ventilation to prevent a harmful concentration of exhaled carbon dioxide. To prevent exhaled water vapor from wetting clothing and bedding and reducing its insulating value, keep the ventilation openings as wide open as possible without causing shelter temperatures to be intolerably cold.
Book Page: 159
Fig. A. A dependable canopy to keep fallout and rain out of a vertical entry. ORNL-DWG 77-20140R 
Book Page: 160